How to Grow Magic Mushrooms for Macro or Microdosing
If you’re considering growing magic mushrooms, you’ll be glad to know that this is a relatively straightforward process. You can grow shrooms on your own from scratch, or with the help of ready-made spore syringes and/or magic mushroom grow kits.
Although growing shrooms really comes down to following a series of instructions, the more steps this process involves, the more risk of contamination there is.
For example, if you opt for acquiring a spore syringe and an uninoculated magic mushroom grow kit, there’s not much that can go wrong as the equipment is pre-sterilized and easy to use.
However, if you choose to make your own spore syringes or create your own shroom growing substrate, you will need to work in as sterile an environment as possible to allow your magic mushrooms to sprout up with no contaminants.
In this guide, we will describe all the steps involved in growing shrooms from scratch. If you already have your mushroom spore syringe and / or substrate, you can skip the steps which don’t apply to you.
Disclaimer: Although magic mushroom spore syringes and uninoculated substrate grow kits are legal because they don’t contain psilocybin, combining them and growing magic mushrooms is still considered illegal in countries where psilocybin is a scheduled substance. We encourage our readers to learn and follow their local regulations.
Step 1: Making a Spore Print
Note: you can skip these first two steps by buying spore prints online if it’s legal in your area.
Spore prints are easy to make, but they require a relatively fresh mushroom specimen; the fresher the shroom, the faster and better this process can be done. You can get a fresh magic mushroom either by picking it in the wild or from your previous growing attempt.
For this step, you will need:
- Distilled water
- 70% isopropyl alcohol
- Tin foil or glass
- Surgical gloves
- Surgical mask
Simply take the magic mushroom you want to make a spore print of and follow these steps:
- Remove the mushroom cap and place it on the sterilized piece of foil or glass (use the alcohol and make sure it dries properly beforehand).
- Put a drop of distilled water on the top of the cap to create the moisture needed for the spores to start being released.
- Cover the cap with a glass and leave to sit for up to 24 hours. If the mushroom is very fresh, this step should take only a few hours.
- The spores will fall on the paper, foil, or glass, creating the spore print.
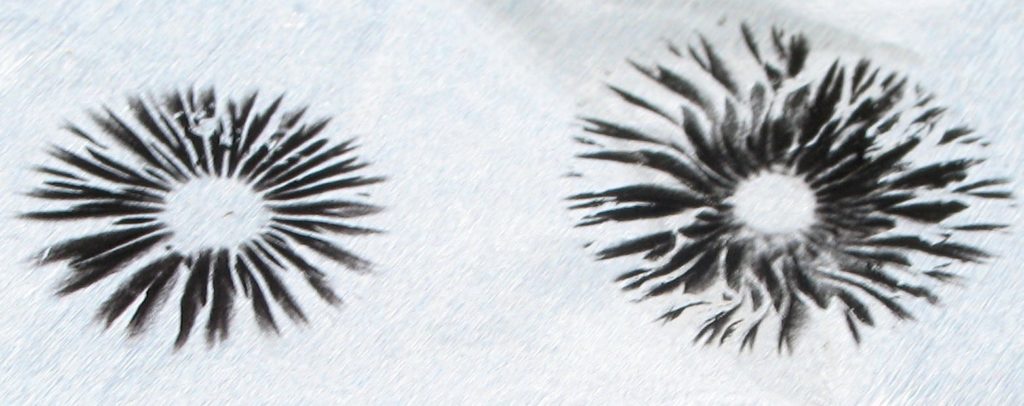
Unlike for mushroom identification, which requires just the aesthetic aspect of the spore print, for purposes of inoculation and to grow shrooms you will need to do this process while wearing a mask and gloves, and in an extremely clean environment with no draft.
Additionally, make sure not to contaminate the spores with your gloves or the surface you’re using for the print. You may sterilize your gloves by rubbing them with alcohol and letting it dry before touching the mushroom.
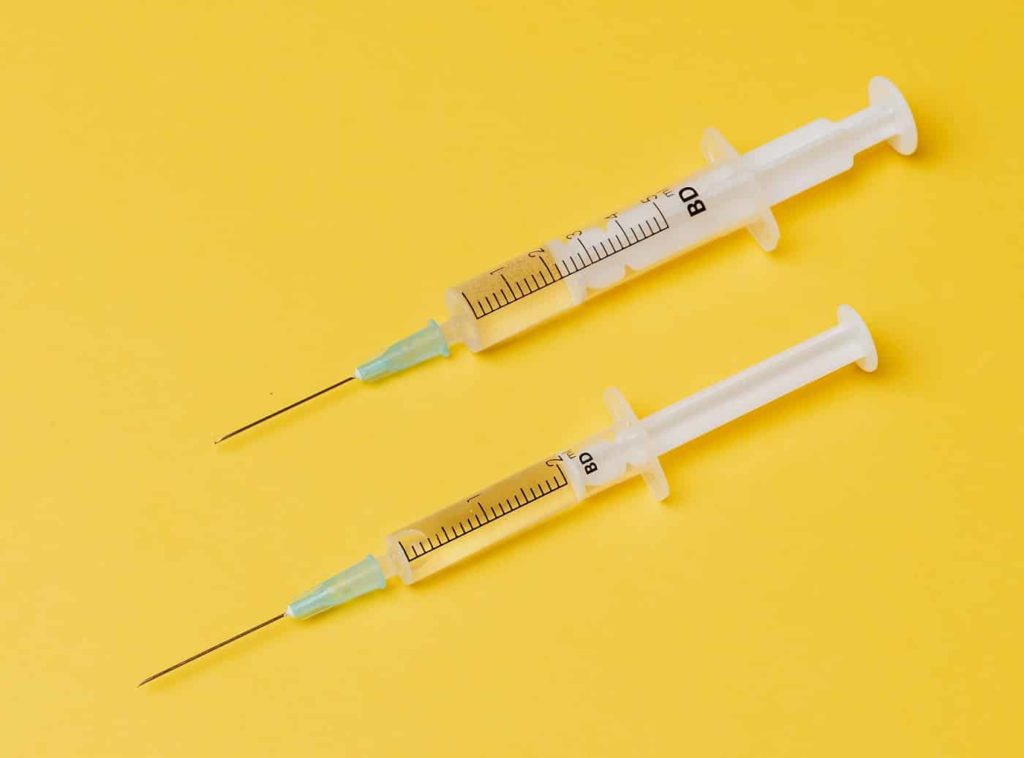
Step 2: Making a Spore Syringe
Making your own spore syringe will require a bit more legwork than a spore print. You can also buy them pre-prepared online if you so choose. To make one at home, you will need:
- Sterile syringe and needle (blunt tip syringe needles will work best)
- Syringe caps
- Spore print
- Scalpel
- Distilled water
- Pressure cooker
- Mason jar
- Still air box (SAB) (learn how to make one)
- 70% isopropyl alcohol
- Lysol or a similar disinfectant
- Surgical gloves
- Surgical mask
- Flame or lighter
Put on your gloves (sterilize with alcohol beforehand) and mask and:
- Pour the desired amount of distilled water (depending on how many spore syringes you are planning to make) into the pressure cooker.
- Cook for 30 minutes at 15 PSI or 248 °F (120°C) to fully sterilize. Let the water cool down inside the pressure cooker.
- Clean the SAB with 70% isopropyl alcohol and spray with Lysol. Let dry and place your spore print inside.
- Once the water has cooled, pour it in a sterilized mason jar and place inside the SAB.
- Sterilize the scalpel with a hot flame. Place in the SAB to cool down. You will be performing the next steps inside the SAB.
- Once cool, use the scalpel to scrape the spores off your spore print and into your sterile water.
- Draw the spore fluid up into the syringe and deposit back again to make sure the spores are evenly dispersed.
- Draw the fluid back into the syringe and cap it.
- Leave to settle for a couple of days.
Once complete, your spore syringe will be ready to inoculate the substrate. You can choose to either create your own substrate or buy a ready-made one. Based on your choice, you may follow either Step 3.1 or Step 3.2.
Step 3.1: Creating the Substrate From Scratch
Unlike plants, fungi don’t convert sunlight into energy for growth. This is why the substrate needs to provide all the nutrients needed to grow shrooms.
Creating your own substrate can be done by combining a few simple ingredients. The options include: brown rice flour, vermiculite, coco coir, sawdust, coffee grounds, soy hulls, straw, manure, and many others. Usually, two to three ingredients are combined.
Different mushroom species will respond differently to these possible combinations, and it’s best to experiment with different ingredients and ratios to find the perfect mix.
However, the best substrate mixes for growing magic mushrooms, which are common and proven effective, are:
- Coco coir and vermiculite (1:1)
- Brown rice flour and vermiculite (1:2.5-3)
Aside from your chosen ingredients, you will also need:
- Distilled water
- Pressure cooker OR regular large pot
- A container or containers for the substrate – mason jars are perfect
- 70% isopropyl alcohol
- Aluminium foil
- Hammer and nail
- Clean strainer
- Surgical gloves (optional)
- Surgical mask (optional)
- Still air box (optional)
What you need to do is:
- Prepare the containers – If you’re using mason jars (disinfected with alcohol beforehand), you will need to punch four holes through the lids using a hammer and nail (disinfected with alcohol beforehand).
- Mix your substrate and add water – If you’re using coco coir, you will need much more water than if you’re using brown rice flour. The desired consistency is moist with no excess liquid. If you do end up with excess water, you can strain it out.
- Pack your containers with substrate – You should fill the containers until half an inch below the rim. Then disinfect the rims with alcohol and top the substrate off with dry vermiculite for added insulation and screw the lids on tightly.
- Pasteurize or sterilize the containers:
- Wrap the containers snuggly in aluminium foil, making sure that there are no openings.
- Place them either in a regular large pot (for pasteurization) or a pressure cooker (for sterilization); you may place a small towel on the bottom of the cooking vessel, ensuring that the containers are not touching it.
- Add water to cover the containers midway and leave to steam for 1h at 140°F (60°C) in a regular pot (for pasteurization) or at 15 PSI or 248 °F (120°C) in a pressure cooker (for sterilization). Take out and leave to cool for a few hours, ideally in a SAB.
A pressure cooker is not a necessity for this step–pasteurization in a regular pot should work well enough.
The method of creating and sterilizing your own substrate requires plenty of care due to the risk of contamination. However, unlike when making a spore syringe, the bulk of this care needs to be applied toward the end, during the actual pasteurisation or sterilization.
It is, however, important that all elements, such as the containers and tools, are sterilized beforehand, but, for example, wearing surgical gloves and a mask and working inside a SAB is not as imperative as it is in Step 2.
Finally, creating the substrate from scratch is an instructional and rewarding process as it entails a level immersion into the life cycle of the mushroom which is not experienced when working with ready-made shroom growing preparations.
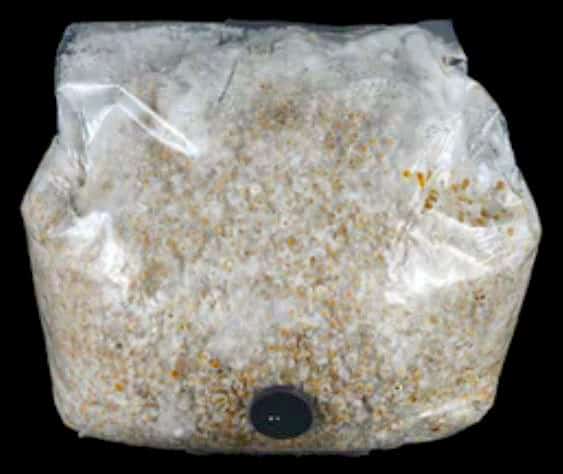
Step 3.2: Preparing a Pre-Made Substrate
Pre-made substrate grow kits have advanced to quite a foolproof level these days—most come in sterilized bags or boxes into which you just inject the spores through special syringe openings on the sides. This fully eliminates the risk of contamination.
Uninoculated mushroom grow kits usually require the grower to inject the spores and then maintain adequate humidity by regularly moistening the inside of the filter bag in which mycelium will develop before fruiting.
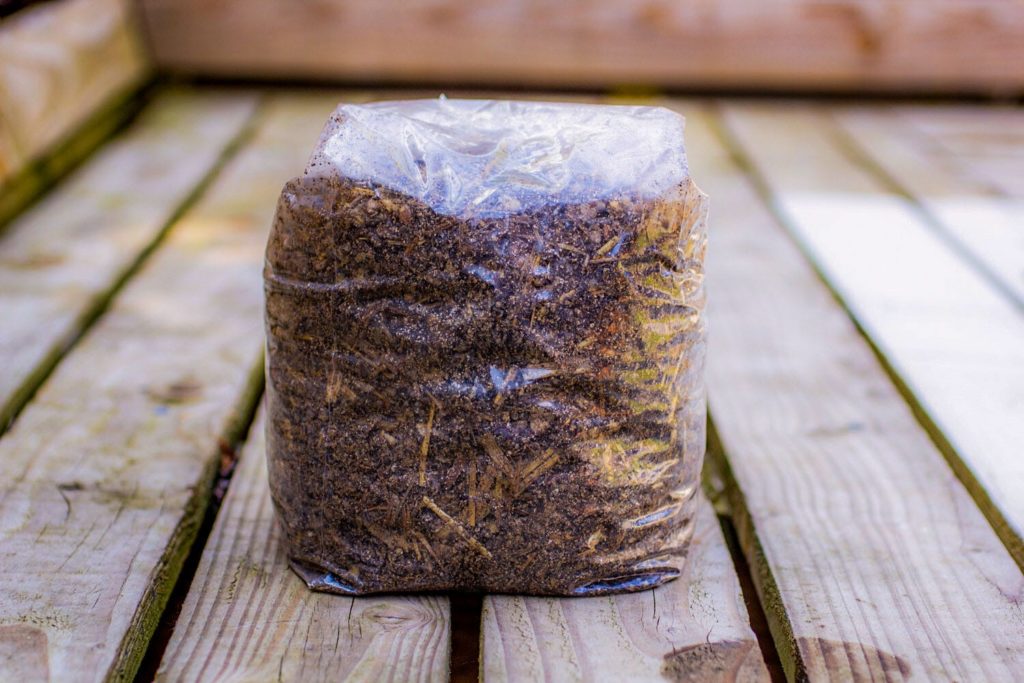
There are also pre-colonized substrate variants available on the market; however, as these mushroom grow kits already contain mycelium, they are not legal to ship to some countries. Check your local regulations beforehand to avoid any unpleasant legal issues.
These kinds of ready-to-use grow kits only require that the user soak the substrate in water and then leave the kit inside a regularly moistened filter bag until fruiting. If you have this kind of magic mushroom grow kit, you may skip Steps 4 and 5.
Step 4: Inoculation
If you are working with an uninoculated substrate kit, the next step is to inject it with the spores.
What you need for this step is:
- Your spore syringe
- Your substrate
- Flame or lighter
- 70% isopropyl alcohol
- Small cloth, cotton balls, or similar
First you need to sterilize the syringe needle by heating it with a flame. Ideally, you should use an alcohol burner because it won’t leave any soot on the needle.
If you’re using a regular lighter, you will need to wipe the soot off after burning the needle; do this with a small cloth or cotton balls with alcohol applied. Give the syringe a good rattle and shake to help break any clumping. Finally, press the syringe plunger gently to squirt a bit of the liquid out and cool the needle.
Next, wipe the needle openings carefully with alcohol-soaked cloth or cotton balls and carefully inject the spores into the substrate container. If you have a small bag, there will usually be only one opening. If you have a box, there will be several, and you should aim to equally distribute the spores throughout the kit.
If you made the substrate from scratch as described in Step 3.1, you will perform the inoculation through holes you had previously punctured yourself.
Step 5: Incubation
The inoculated substrate is then left in a place where it will not be disturbed, with a consistent temperature between 75 and 81°F (24 and 27°C). It doesn’t particularly matter if it is dark or not, but it should not be in direct or indirect sunlight. You should see signs of growth 3-10 days after inoculation.
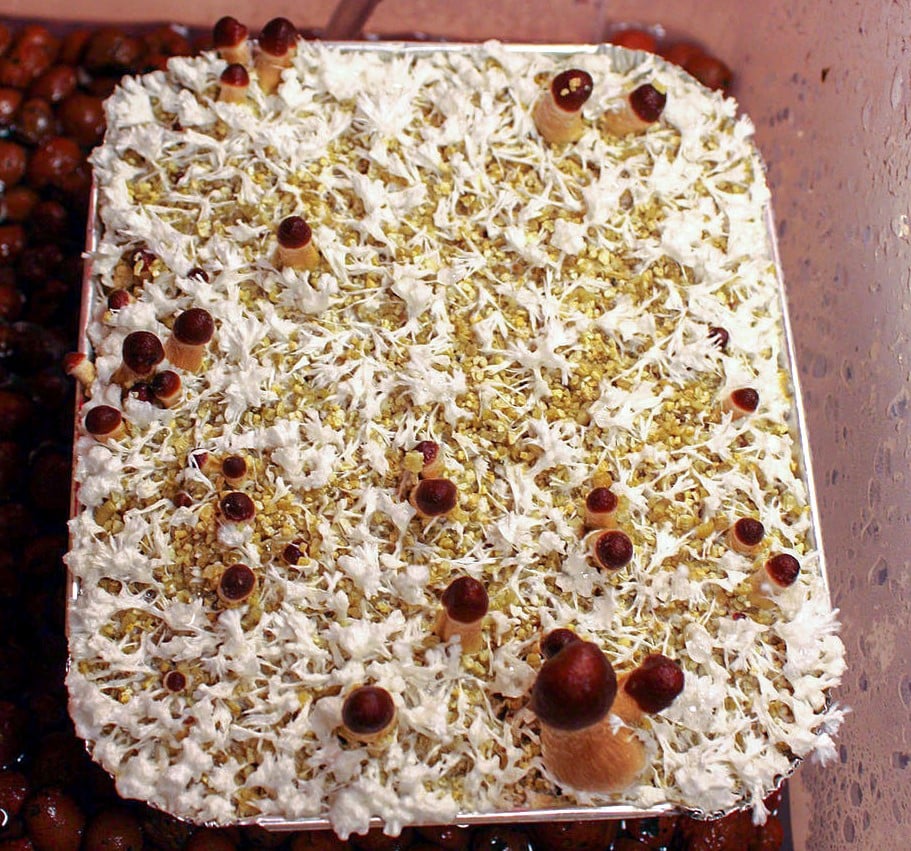
After approximately three to four weeks, the mycelium will have colonized 70-75% of the container. If you have a bag, you may, at this point, break up the substrate with your hands through the outside of the bag; this will accelerate the final stages of colonization. This should not be done before the 70% mark or it may impede colonization.
At four to five weeks after inoculation, the mycelium will have colonized 100% of the container. If there was no contamination—indicated by dark spots—the container should, at this point, be opened and carefully (using sterilized gloves) placed in an ultra-clean zip-lock bag with a filter.
Step 6: Fruiting
The bag with the colonized substrate is then introduced to less strict conditions: it needs to be in an environment with a temperature between 60 and 80°F (16 and 27°C). It also needs to receive at least 12h of light per day, but should not be exposed to direct sunlight. Full spectrum fluorescent bulbs can do the trick if there are no suitable spots with natural light available.
The filter bag should be opened daily and the substrate or the inside of the bag should be sprayed with clean mineral or distilled water to maintain humidity. Five to six sprays from a mister should be sufficient.
If the substrate appears to be fairly moist, you can skip misting on some days. Also, if excess water builds up in the bag, carefully pour it out after you mist the substrate, being careful not to get the filter wet.
After misting, you should air out the bag by gently moving its sides in a fanning way. This will help oxygenate the substrate and release any CO2 that’s been built up.
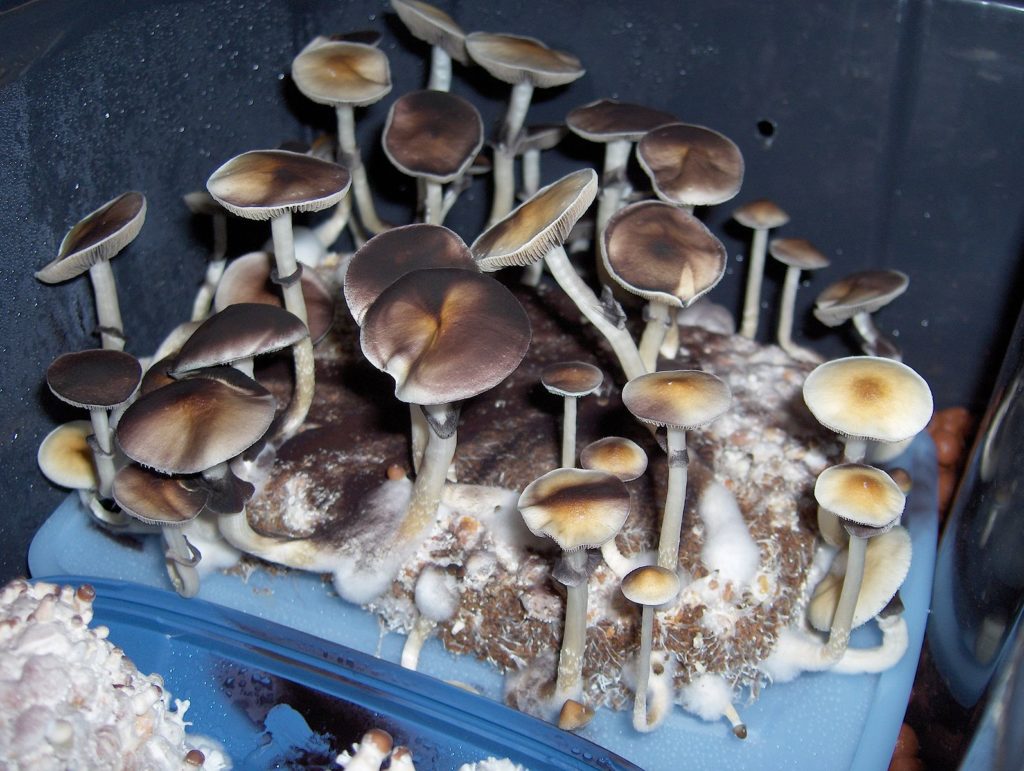
After about two weeks, pinheads will start to emerge. From that point, it takes up to two more weeks for them to fully fruit.
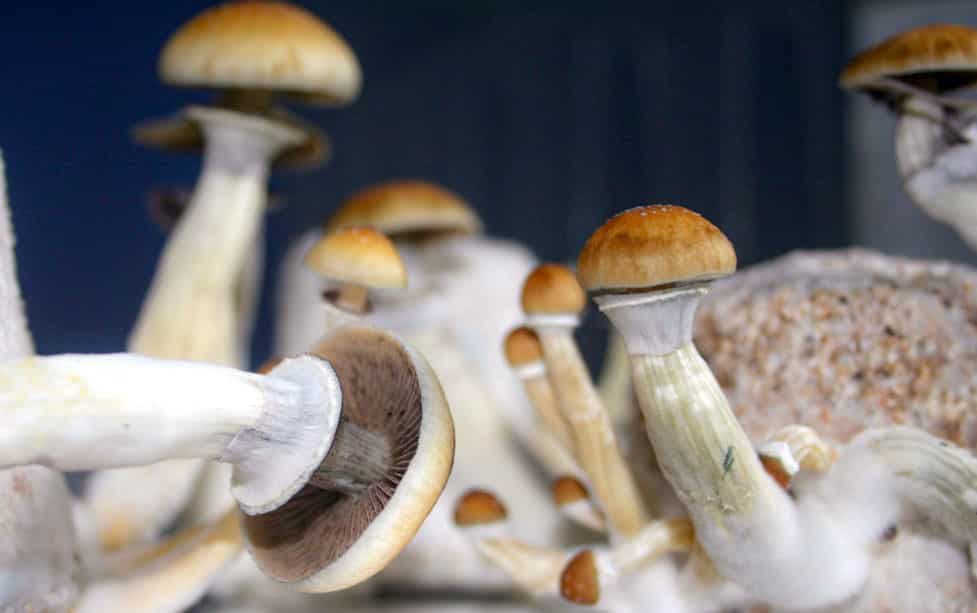
Step 7: Harvesting
The fully developed mushrooms should be harvested right before the veil on the underside of the cap breaks open. If that happens, some spores will be let out and they will create dark spots on the mycelium once they come in contact, but this is not a big deal.
You should harvest all mature mushrooms apart from any newly formed pins, which should be left for the next cycle.
When harvesting, you should gently but firmly grab each mushroom by the stem near the base of the cake, and twist in a counter-clockwise direction while pulling it out. You should wear disinfected gloves and be very mindful not to touch the mycelium or you may contaminate it.
Alternatively, you can use a disinfected knife / scissors to cut at the base by the cake. For smaller mushrooms, you are advised to use disinfected tweezers.
Step 8: Repeat and Deplete
Grow kits typically produce three to five mushroom batches or ‘flushes.’ After the harvest, the substrate is simply humidified again and Steps 6 to 8 are repeated until it’s depleted (no longer produces mushrooms).
Each subsequent harvest cycle should take about 7-10 days.
You may be interested in learning about A New Way to Grow Magic Mushrooms (Without the Shrooms!)
Learn How To Grow Mushrooms From Scratch!
If all this seems a little complicated, DoubleBlind have launched an easy-to-follow online course to help you grow mushrooms for the first time. It contains 7 video lessons and includes live access to experts. Sign up now by clicking the banner below, and use code “ENTHEO” for 20% off!
Hopefully these instructions will help me grow some shrooms.
I have a spore syringe pre-made growing bags.
This will make the 3rd or 4th attempt to make some.
Not sure what I have been doing wrong. I do need help.
I live at a poverty level of income so money has been a factor.
I am a senior, some what disabled and live alone.
What little family I have had, left me. I can count the friends
I have on one hand. Always been a free spirited loner, anyway.
I was doing psychedelics first time in 1969 but haven’t done any
in over 20 years.
Mostly I have boredom from an isolated life. I have done shroom
probably 30 years ago and really like the mental and physical
sensation they gave me. I truly believe they can help.
Wish me luck with this next attempt to grow my own……..
Tried using the p-tec method to grow mycelium with out a whole lot of luck. I tried the Bag approach and had 1 bag grow mycelium, it is till growing. Went back to the p-tec method and followed the directions to a T. My spores I bought online from a reputable seller. My substrate was vermiculite and brown rice. I then put in a large pot with a towel on the bottom. All 6 of my mason jar’s progressed nicely. I opened the 1st jar to find I had what I would call fruit fly’s. I put the cap back on put the jar in a plastic baggy and threw out. The other 5 were perfect. I even had some mushrooms growing when I opened the cars and shook out on a bed of damp. Not wet vermiculite. The blocks are starting to show spore growth